Tuesday, April 16, 2013

Vase


Brian, Miles, Rick

Continued the vase project.

Everyone hada pretty good glue-up square.

Leo suggested taking a block plane and fair off the edges of the square.
Then use a square to find the exact center, using a scribe knife.

Then take a round block of wood to screw onto the top. Center it with a brad.
Then drill 4 holes around the periphery and screw the temporary block onto the top.
Use one colored screw (green) so as to be able to mark where the holes are for relocation and make a pencil line on the wood by the green screw.

This end is going on the tailstock.
Cut a square boss on the opposite end.
His will fit into the 4-jaw chuck.
Make it small enough to engage the chuck  jaws easily (1 7/8 about)
Mount this boss onto the 4-jaw at the headstock.
Using the tool rest, turn the square by hand to see how closely it is centered. If one corner is off, remove the piece, put masking tape onto the boss at the opposite corner and re mount.
Do this repeatedly until you have your square centered.
The center the tailstock end.
Turn the square and if one corner is off, stabilize the tailstock center with a block of wood under it, then tap the wood with a mallet to move it in the proper direction.
Repeat this until the tailstock end is square.
Then you can turn the piece to a round cylinder.

Tip:

A Jarno taper is what most drill press Jacob Chucks have.
This won’t fit into a morse taper tailstock .

Vase project Photos

Tuesday, April 2, 2013

Vase continued


Paul, Brian and Miles

Leo explained more about the thicknesser.

The table is suspended from the top on two large screws and is raised and lowered on these. As wood enters and the first roller hits it, it actually tilts the table slightly, ths causing the snipe until the outfeed roller is encountered. If a stick of wood is jammed under the table (eg for the final planing cut) it prevents the tilt and snipe. Leo’s planer has two rollers on top and two underneath. The smaller ones have just the two top rollers.

He then went over the glue-up. 

For the top and bottom slabs, he first glues up the thinner slats by placing them all together and clamping them  (without putting glue on the center between each three mating pieces). This way it is a solider thing for the clamping process. A small dab of glue can be placed at the very ends of the center pieces to keep it from slipping. The ends are cut off once the glue dries. Once these are dry, he glues on the end blocks, keeping everything flat. Once dry you can scrape off the surfaces but you can’t plane any off.

Tip:

If you have several pieces glued and the bottom is uneven, a flat piece can be glued to the underside  center with a dab of glue and then the piece is run through the thicknesser to plane off the top section. Flipping it over it  finishes the job.
Vase project Photos

Tuesday, March 19, 2013

Vase project continued


March 19/13  Paul, Rick, Brian, Miles

Leo went through the process of using the thickness planer to do exact replications. He demonstrated the use of a wedge, marked with a pencil line so that one can register the same planer adjustment for future cuts of the exact same thickness.

Paul had a glued up square and started the turning.
It was obvious when this was done that unless the blank is carefully glued up and square, the resulting vase profile will be very hard to get uniform.

Leo showed how to use the 4-jaw chuck to get exact centering of the vase mounting.
Use the tool rest, set a corner of it close to one edge of the squared block, rotate the block and note the gap at each corner.
Tape the piece on one end to readjust the center. Until each corner touches the tool rest.

Tuesday, March 5, 2013

March 5/13


Jim Hiltz, J MacLean, Brian, Miles, Chris, Rick, Paul

The lads brought in the vase glue-ups and problems were immediatley noticeable!
Paul had failed to have the center block wide enough.
Rick's was equally shameful.
Jim Hiltz's was barely presentable.

Leo went through the process of designing the colors and patterns again and this time stressed that one has to make a pattern that will suit the available stock.

Eg.:  dont have a square piiece that is to be 2 /18 because it is hard to get stock  to make this. One would have to use 3 inch stock and waste a lot.

Leo calculated the sizes of the pieces that would best suit the small vase and still be suitable to enlarge to the big vase dimensions

The photos show this.

We discussed making a planing board to do thin strips.
This is a very valuable Jig.
See photo.

Use a one inch slab or use 3/4 ply and glue strips under it to get to a one inch slab.
Glue sand paper and a stop on one end .
This will avoid getting snipe on the ends of the planed strips.

When planing the strips on edge, assemble them together and dab glue on the ends.
Once all planed to  proper thickness, cut off the glue ends.

We agreed that Leo would make up the dimensions needed to start a new vase, email it out to us,  and we would get the stock and bring it to the next meeting and plane it up at Leo's.

This was a very valuable session  as far as learning is concerned.

Leo continues to impress members with his vast knowledge base.


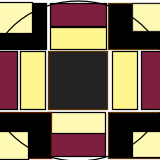
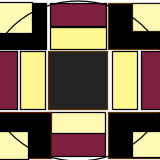
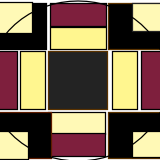
STOCK LIST FOR VASE 3 5/8 X13
FINISHED SIZES

WALNUT 1PC. 1 3/8 X 1 3/8 ------- 13”
ASH 4PC 1 3/8 X 3/8 ---------13”
CHERRY 4PC. 1 3/8 X 3/8 ---------13”
WALNUT 4PC. 1 3/8 X 3/8 ---------13”
OAK 4PC. 1 3/8 X 3/8 ---------13”
MAHOGANY 4PC. ¾ X ¾ --------------13”

21PCS.
SUBSTITUTE ANY WOOD SPECIES YOU LIKE AS LONG AS MEASUREMENTS STAY THE SAME

IF YOU DON’T HAVE THE RIGHT STOCK OR SPECIES I THINK I CAN FIND ENOUGH HERE

FROM THE STOCK LIST OF THE SMALL ONE YOU SHOULD BE ABLE TO FIGURE OUT WHAT YOU NEED FOR THE LARGER ONES

IF YOU INTEND TO MAKE ONLY ONE VASE NEARLY ANY ARRANGEMENT OF WOODS WILL DO

IF YOU WISH TO MAKE ONE FULL SIZE 0R AS PAUL SUGGESTED A THREE QUARTER SIZE YOU MAY HAVE TO 

CONSIDER THE COLOUR ARRANGEMENT FOR THE MATERIAL IF YOU WANT THEM TO BE THE SAME PATTERN. .

A SET OF THREE PIERCES WELL DONE WOULD REALLY BE SOMETHING

MEASURMENTS ARE FINISHED SIZES ,ALLOW AT LEAST I/8 “ FOR DRESSING AND 1 ½ FOR LENGTH

DRAWINGS ARE ROUGH AND INTENDED ONLY FOR STOCK SELECTION AND THE SIZES NEEDED.

FOR THE FIRST GLUE UP IT WOULD BE ADVISABLE TO MAKE IT AFULL SIZE SQUARE 3 5/8 X3 5/8 X15

BRING STOCK DRESSED STRAIGHT AND FLAT ON ONE SIDE ONLY AND ENOUGH MATERIAL TO FINISH IT UP TO 
THE GIVEN SIZES

Tuesday, February 19, 2013

Feb 19/13


February 19/13

Brian,Rick,Lawrence, J Hiltz, Miles, Chris

We decided on two projects:

1 Bar stool with four legs: top 10-11 inch diameter, legs 30 inches
2 Tapered vase.

Leo went through the methods of reducing the scale of a dimensional drawing. 

The vase is 27 inches tall and 7 inches diameter at the base.

We reduced it by half, using a compass and divider method.

The glue up block should be contrasting wood colors.


Vase prooject Feb/13


Tuesday, January 29, 2013


Jim MacLean, J Hiltz, Rick, Chris, Miles, Roy, Scott MacLeod, Brian, Paul

Work continured on the trays and rolling pins.
Leo reviewed the finish:

Stain, salad bowl finish x 2, gold acrylic, rub off with Methanol, salad bowl finish.

Leo demonstrated a steel jig he ade to cut three inch sand paper discs on the drill press.

Leo demonstrated a planer that is used on the drill press to plane off a surface.
He showed how to flaten a glued up piece using this method.

Leo discussed table saw blades, explaining the hollow ground type and demonstrating how a swedge is used to flare the teeth
Curved serving tray

Wednesday, January 9, 2013

Post Xmas meeting

Lawrence, J Hiltz, Paul, Miles, J Maclean, Roy, Chris
(Rick called in sick!)

The lads met on January 8/13 after the Christmas Holliday.
Work continued on the rolling pins and the Sushi tray.
Paul had a turned rolling pin that had no centre drilled.
Leo demonstrated how to drill it on the lathe.
To protect the wood, tape some wooden blocks of equal thickness on the jaws of the 4-jaw chuck.
This is to protect the wood.
The piece is held between centres.
The headstock chuck is rotated and the jaws are tightened in individually until the wood is centered.
An accurate way to do this is to place one end of a long stick under the workpiece, extending away from the lathe and resting on the tool rest.
As the headstock is turned by hand the far end of this stick can be seen to go up and down according to the degree that the piece is out of centre.
Adjust the jaws accordingly until there is very little movement at the end of the stick.

Leo has been granted the Order of Canada and a celebratory cake was presented in this great honour. We all agreed that it his high time that this award was given to the Professor.

Two new people attended from Louisbourg:
Gary Perry and Bennie Fudge 

Tuesday, December 4, 2012

Biweekly meeting

December  04 ,11, and 18 , 2012

Scott MacLeod, a new member, attended tonight.Jim Maclean, J Hiltz, Paul, Brian, Roy Troke, Rick were also in attendance.

We continued to work on the serving trays.
Most people have the tray glued and the feet parts ready to cut to shape.
Leo explained how to round the edges of the tray using hand plane and spokeshave and sand paper.
The edges are then coated with a bond: whiting or porter cement and acrylic bond.
Layer this along the four edges and sand it off once dry.

Leo also gave some instructions on making a rolling pin.
The wood glue up was explained.

Once piece for the center 7/8 inches thick by 2/12 wide:
Glue up two different color woods for the outside
and bisect them on the diagonal, lengthwise.

We will make a center dowel.
Bring a length of wood a little more than 3/8 thick and 22 inches or so long for the next workshop.
We practiced making this dowel with Leo's special dowel maker, which worked like a charm.

Tuesday, November 20, 2012

Paul, J Hiltz, Naq, Miles, J Maclean, Lawrence, Rick, Brian, Charles McGuigan (new)

Work continued on the serving trays.

The leg pieces were cut.
The stock is about 1 1/2 inches wide and 7/8 thick and about 16 inches long.
The curved recess is done on the table saw  by running the piece across the blade  in a perpendicular direction, thus scooping out a recess. The blade is positioned just a shade above the table top for this and a fence is placed across the top of the table near the blade.

The profile is then scraped using a curved scraper  as close as possible to the shape desired.
Then it is sanded.

The bottom edge is then passed across the jointer to get a 29 degree angle.

The piece stands  on this edge and is held , end on, against the tray(which is supported on two sticks to raise it up) and a pencil mark is made to draw the curve that  matches the bottom curve of the tray.

This profile is then cut by making various passes on the jointer .
It is finished using a hand plane and sanding.

It will be then profiled  using the band saw and a jig to hold the curved edge flat on the table.
This is a flat thin strip glued to the bottom of the foot piece .
Once profiled this way, the stick is cut off.
It is then screwed onto the tray bottom and the sanding jig is used to make the bottoms even.

Staining:

Folkart outdoor metalic gold paint (Walmart)
Mohalk black stain, Salad bowl finish

Apply 2 coats black
Salad bowl finish
Gold coat
Sand off the gold.
The grain will highlight in gold
Salad bowl finish several coats

See photos.

Paul distributed cans of Behlens Salad Bowl finish at a bargain price.

Curved serving tray


Tuesday, November 6, 2012


Serving Tray

Miles, Brian, J Hiltz, J Maclean,Paul
We discussed the fall show and decided that it would be better to work on an Easter show as it is late in the year now.
Leo went over some Tips;
Paint brushes can be suspended above bottom of the jar in the thinner layer to keep the bristles straight; wrapping the bristles in a foil wrap also helps.
When cutting plywood, use a hollow ground blade with no set in the teeth and use a sled. He made one that has a masonite base. Each side of the masonite can be tapped into the blade to creat a zero clearance cut and this results in no splinttering of the stock cut.
A piece of wood can be hollowed out by running it perpendicular across the blade. Various shapes can be done this way (See photos)
We decided on a serving tray project..Japanese style curved tray.
This is done using layers of plywood eg one 1/4 inch and one 1/8 inch piece. The finished thickness needs to be able to accept screws for the feet so don't have it too thin.
These are glued together on a caul that can be adjustable. Use yellow glue. After the clamps are tightened, wait a few minutes and undo them since the plywood pieces slide on the first tightening. Reposition them and retighten.

The photos show the jigs used to do this.
The feet are cut from a hardwood like walnut..a contrasting color.
The project will be about 14 x 11 inch .
The feet will be 8 1/8 x 2 1/8 with a curved profile.
The feet are positioned 3 3/4 inches from the end of the tray.
Use a piece of stock about 7/8 thick to do this.
Leo will buy the necessary plywood and lend us the jig to make the glue-up.
We want this done before Xmas.
Curved serving tray